Signed in as:
filler@godaddy.com

NO Circulation
No Circulation is the term used in paediatric first aid when a child or baby has stopped breathing. The heart is no longer pumping blood around the body.
There are many incidents or illnesses that may cause circulation to fail. Here are just a few.
CPR-Non Breathing Child
You have just completed your Primary Assessment:
1. You checked for danger
2. You checked for a response
3. You shouted for help
4. You opened the child's airways
5. You checked breathing for 10 seconds
You are on your own. The child is not breathing.
WHAT DO YOU DO NEXT?

IMPORTANT!
Should help be available, it is important to send them to call for the emergency services as soon as non-breathing is established.
Note: This is a practical subject and will be taught further in your workshop.
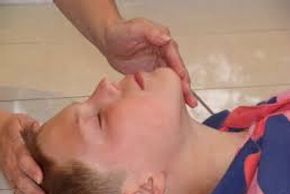
HEAD & CHIN TILT
Just before you give 5 rescue breaths, you must ensure the airways are clear and the tongue is lifted from the back of the throat. You should have noticed if there are any objects in the area of the mouth. Consider a Pocket Mask if blood or vomit is present.
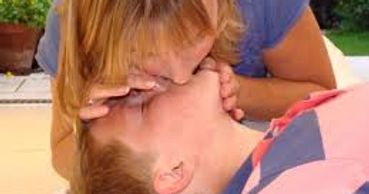
5 Rescue Breaths
Pinch the child's nose while their head is tilted back, form a seal with your mouth over the child's mouth, force the first breath in, looking at the chest, look for the rise and fall. Once you have established the air is going in, give a further 4 breaths steady, release the nose between each breath.
30 Compression's
Give the child 30 compressions with one hand placed in the center of the child's chest between the nipple line. Compress to the depths of 5 cm and at a rate between 100-120 compressions per minute.
2 Rescue Breaths
Give child 2 more rescue breaths, mouth-to-mouth. Remember to pinch the child's nose to prevent air escaping.

REPEAT
30 Compression's
Give the child 30 compressions with one hand placed in the center of the child's chest between the nipple line. Compress to the depths of 5 cm and at a rate between 100-120 compressions per minute.

🫁 Respiratory Arrest
.

CPR-Non Breathing Baby
You have just completed your Primary Assessment:
1. You checked for danger
2. You checked for response(Flick Foot)
3. You shouted for help
4. You opened the baby's airways
5. You checked breathing for 10 seconds; babies tend to breathe
fast at between 30-60 breaths per minute.
You are on your own. The baby is not breathing.
WHAT DO YOU DO NEXT?
IMPORTANT!
Should help be available, it is important to send them to call for the emergency services as soon as non-breathing is established.
Note: This is a practical subject and will be taught further in your workshop.
HEAD & CHIN TILT
Just before you give 5 rescue breaths, you must ensure the airway is clear and the tongue is lifted from the back of the throat. You should have noticed if there are any objects in the area of the mouth. Consider a CPR Pocket Mask if blood or vomit is present.
5 Rescue Breaths
While their head is tilted back, form a seal with your mouth over the babies mouth and nose, blow lightly into the baby's mouth and nose, look down at the chest, looking for the rise and fall. Once you have established effective rise and fall, give a further 4 breaths steady, lift your head away between each breath.
DO NOT FORCE BREATHS
30 Compression's
Give the baby 30 compressions with two fingers placed in the center of the baby's chest between the nipple line. Compress to the depths of 2-3 cm and at a rate between 100-120 compressions per minute.
2 Rescue Breaths
Give baby 2 more rescue breaths, mouth-to-mouth and nose.
REPEAT
30 Compression's
Give the baby another 30 compressions with two fingers placed in the center of the baby's chest between the nipple line. Compress to the depths of 2-3 cm and at a rate between 100-120 compressions per minute.

1 Minute Rule
When established, the baby is not breathing
You should conduct CPR for 1 minute
5 -Breaths
30- Compressions
2 - Breaths
30- Compressions
Pick the baby up and find a phone to call 999/112
EASY TO REMEMBER
5-30
2-30
GO!
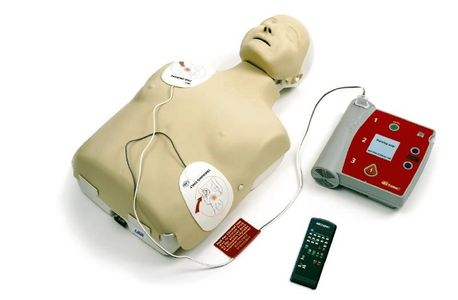
It is not advised to use the AED baby under 12 months old. Once you start CPR, do not stop until the medical services have arrived.
It is important to know that this cycle should take no more than 1 minute. The aim is to resuscitate the baby.
You must phone for an ambulance if you are on your own after 1 minute of CPR.
Note: TAKE THE BABY WITH YOU.
Important!
Once you have made that call, lay the baby on the floor and continue with effective CPR
2 Breaths then 30 Compressions
Do Not Stop!