Signed in as:
filler@godaddy.com

Dealing with a choking baby is difficult to deal with the same principle applies to a choking child and a baby, i.e.

Babies tend to gag on food. This is a normal process of baby reflexes; babies tend to swallow the food or spit it out. Choking babies will remain silent with NO NOISE. Where a child can grip their throat and point, a baby cannot; it is important to monitor a baby, especially when they learn to pick food up and eat it.

The reality of dealing with a choking child or baby is common and frightening; as mentioned before, it's about doing the right procedures at the right time.
Difficulties arise when you are on your own. The drills we teach are simple and effective. What is important to remember is that when you are on your own, do everything possible to clear the baby's airways.
The procedures taught on Life Lines courses take seconds to perform in real-life situations. Learn them; they may help you someday.
Choking is best taught as a practical subject and is taught in great length at our paediatric Courses.

The recognition features of a partial blockage are that they will be:
Remember, in a partially blocked airway, the baby will be gagging, gasping, and making noise. The method to unblock the partial blockage is straightforward:
Identify the object; some objects may have sharp edges and could cause injury to the baby's airway. Always be prepared for the Partial blockage to become a full blockage.

A choking baby can be a frightening experience. The incident can be dealt with quickly, or it can go badly wrong. The decision has to be made to contact the emergency services when it does go wrong. Should you have help available and the object can not be removed from the baby's airways, you must send them for help as soon as possible. CPR must commence once the baby is unresponsive. Read the information below.

The recognition features of the full blockage
SHOUT CHOKING BABY
Let others know
The baby is choking; take the baby out
of the high chair and tilt the baby forward. The Head must be lower than the rest of the body. Try to scrape the food out with your little finger.
Be careful not to force the food back; some food may come out. "PAUSE" wait for the "CRY.
Get Ready for Step 2
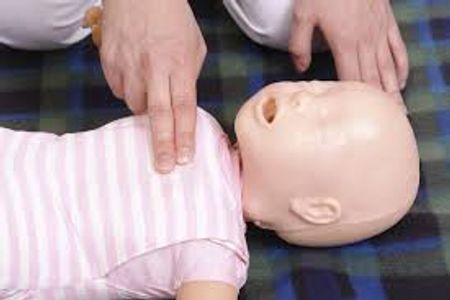
Place the baby over the thighs of your legs. The picture above gives a demonstration.
Your legs will support the baby, ensuring the chest of baby is in contact with your thigh. Place a hand on the chin of baby and extend the airway, lifting the head up.
Proceed with five back slaps; you must use reasonable force, the aim is to dislodge th
Place the baby over the thighs of your legs. The picture above gives a demonstration.
Your legs will support the baby, ensuring the chest of baby is in contact with your thigh. Place a hand on the chin of baby and extend the airway, lifting the head up.
Proceed with five back slaps; you must use reasonable force, the aim is to dislodge the object, reality, the baby could die if you don't.
NOT WORKING
Get Ready For Step 3
The chest thrust is used for the baby, i.e 0-12 months old.
Roll the baby over on your thigh "Do Not Flip" The aim is to allow gravity to assist in the removal of the food or object.
By flipping the baby, you may have missed a golden moment as the object was dislodging.
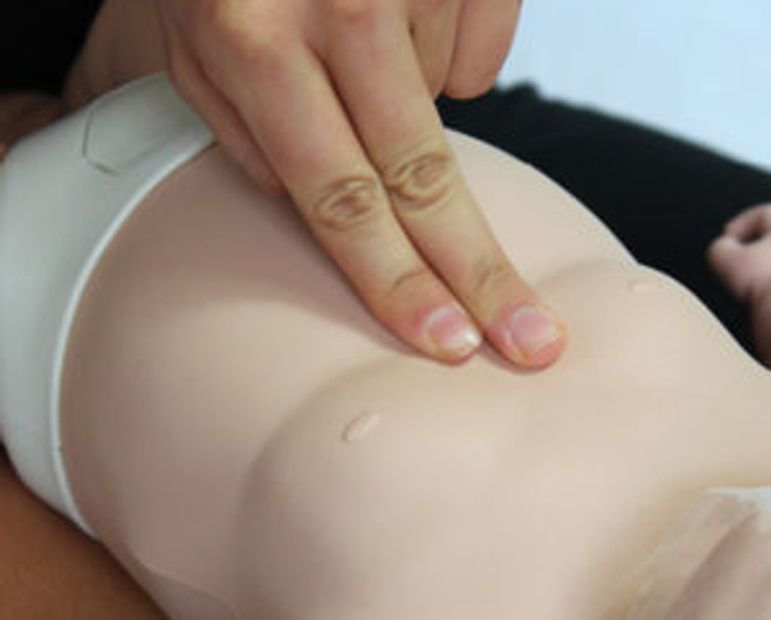
To perform the chest thrust, lay the baby across your thigh, this time on their back. Place 2 fingers in the centre of the baby's chest, between the nipple line and draw then fingers back 3 inches.
Force the fingers into the baby's chest, thrusting the fingers up the baby's chest.
The aim is to use the air in the baby's lungs to force the object out of the baby's airways.

IMPORTANT QUESTION-
What do I do if I'm on my own?
You should do everything possible to remove the Object. Use the process taught above. The baby will
become weak, they will go unconscious, they are not breathing, and will quickly go into cardiac arrest.
What Next?
Give the baby 5 good rescue breaths, mouth-to-mouth and nose. Should the Chest rise and fall, this indicates you can pass air past the object. If there is no rise and fall, the airway is still fully blocked.
What Now?
Give the baby 30 compressions with two fingers placed in the center of the baby's chest between the nipple line. Push a little harder, as this may force the object up.
Continue With
2 more rescue breaths, mouth to mouth and nose. Followed by another 30compressions.
If the airway does not clear, then you must go and make the 999/112 call.
TAKE BABY WITH YOU
Once you have made the call, place the baby on the floor and continue to perform CPR
Ratio 2 breaths with 30 compressions
The fact is that babies require more oxygen than children and adults. This means they will incur brain damage at a faster rate. As Paediatric first aiders, we must think about our actions and why we do these drills. The harsh reality is that if we fail to clear the baby's airways in the first 60 seconds, the baby is in trouble. These procedures are known to clear the airways and save lives. When on your own you must try to remove the object through back slaps and chest thrust, once you get to your 3rd set, without clearing the airways the baby is clinically dead, However as the body goes limp the object obstructing the airways may loosen, CPR can be used to push air past the object with compression's used to force the object up. Should the object dislodge, simply roll the child onto their side and use your small fingertip to scrape the object out.
At this stage, the baby may still not be breathing." HAVE A GO." Use CPR to get the baby breathing again.